Dan Dressler
  • Home
  • My Work
    • acrylic transfer
    • Summer_2019
    • Beneath the Surface
    • Multi Media Collage
    • Photography
    • Drawings
    • Mono Prints
  • Contact

Visual Art 2D Projects

Extercise 1: Cubes & Rectangular Blocks

9/5/2018

 
One point perspective tutorial
The following tutorial explains how to draw one point perspective step-by-step.
EXERCISE 1: CUBES AND RECTANGULAR BLOCKS
Drawing rectangular blocks is often the first one point perspective lesson given to students. It is a simple exercise that provides a solid foundation for things to come.
Picture
Picture
Picture
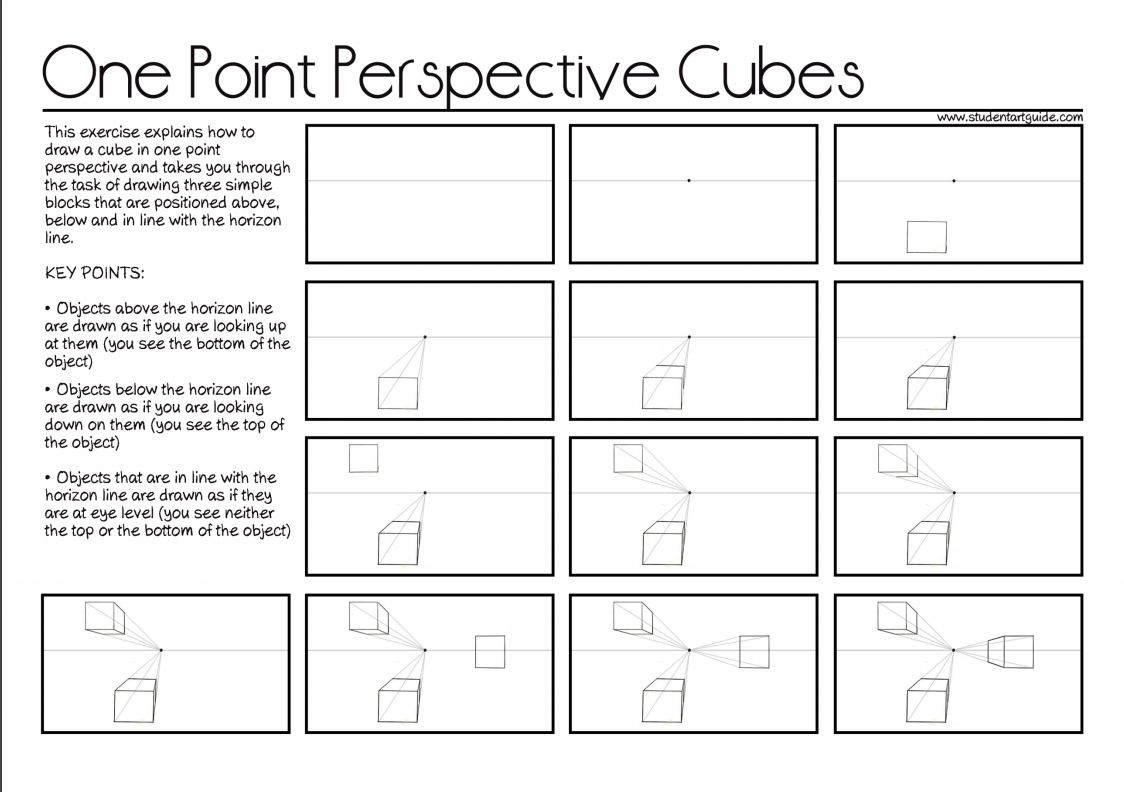
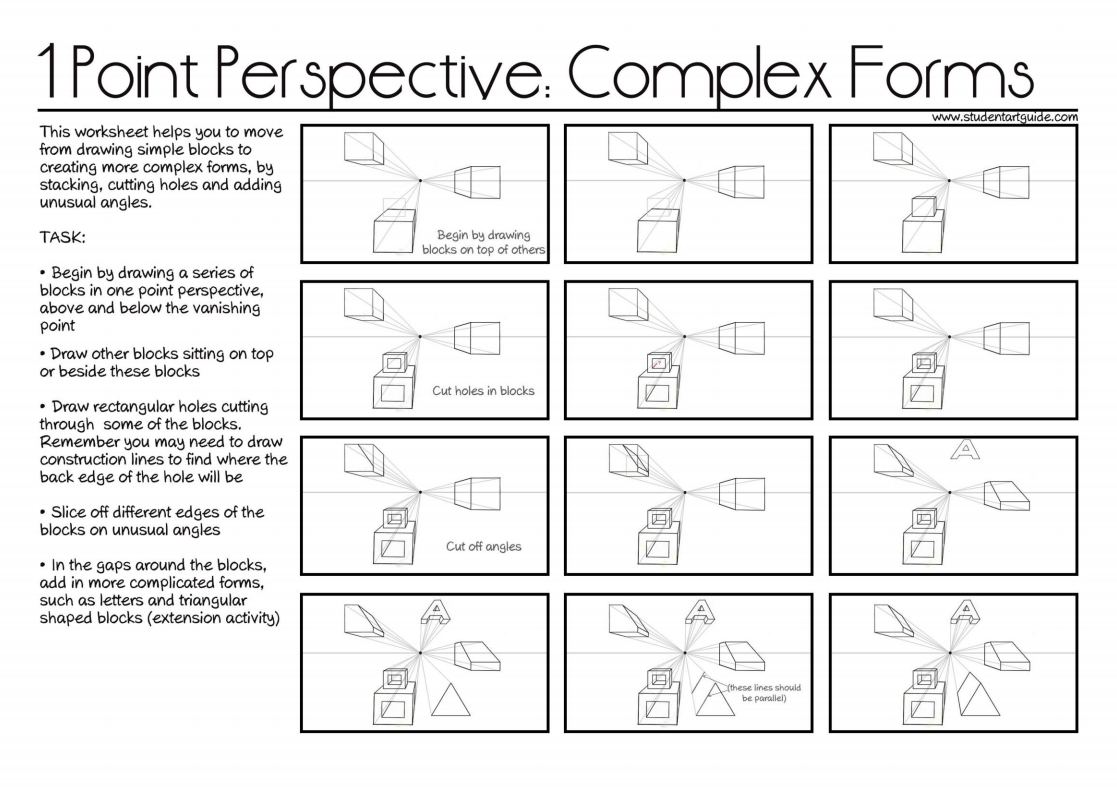
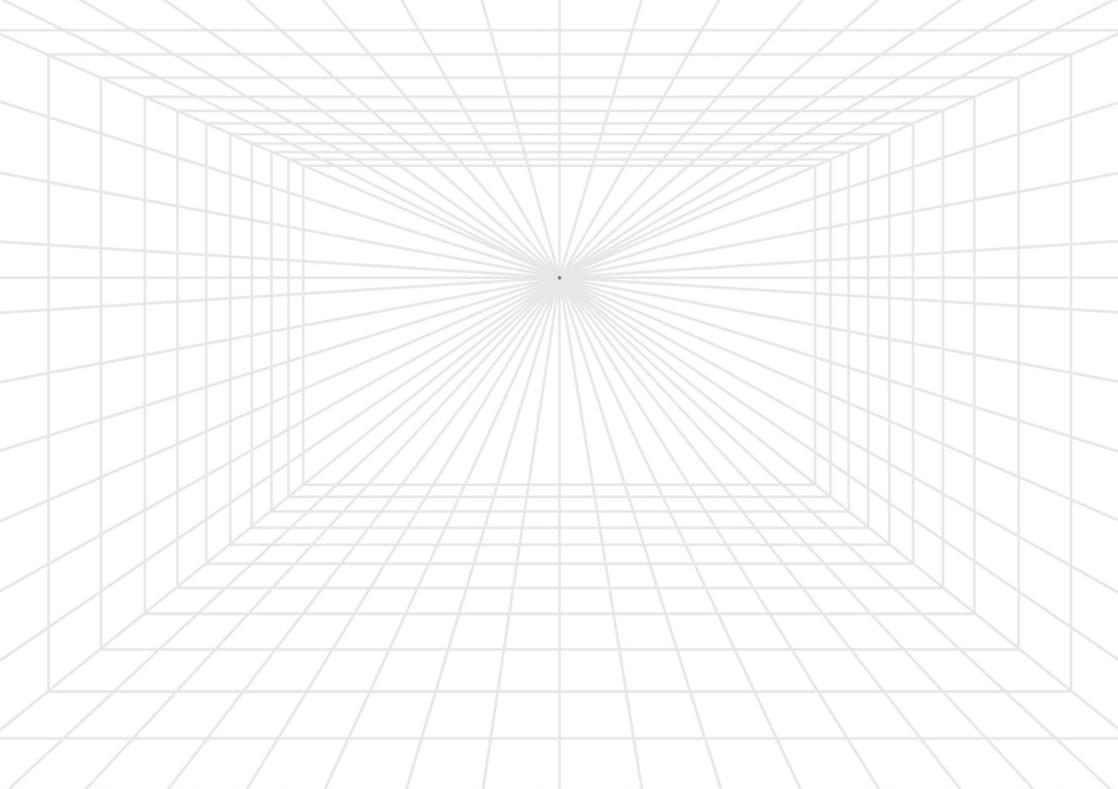
This worksheet explains how to draw a cube in one point perspective and takes you through drawing these above, below and in line with the horizon line. It introduces the importance of line weights and highlights the effect of positioning objects in relation to the horizon line.
By the completion of this exercise, you should be able to:
  • Use appropriate line weights (light lines for construction lines; dark lines for outlines)
  • Position a vanishing point and horizon line correctly
  • Understand that:
    • Objects above the horizon line are drawn as if you are looking up at them (you see the bottom of the object)
    • Objects below the horizon line are drawn as if you are looking down at them (you see the top of the object)
    • Objects that are neither above nor below the horizon line are drawn as if you are looking directly at them (you see neither the top or the bottom of the object)
This information is demonstrated in the video tutorial below:

Rules of Perspective: True Shapes, Vanishing Points & Horizon LInes

9/5/2018

 
In one point perspective, surfaces that face the viewer appear as their true shape, without any distortion. They are drawn using primarily horizontal and vertical lines, as illustrated by the diagram to the right:
​In this one point perspective photo, surfaces facing the viewer are undistorted and show their true shape. For example, we see the side of the bath, window and facing surfaces as ordinary squares and rectangles. Their sides are parallel with the edges of the photograph.

​


Surfaces that travel away from the viewer, on the other hand, converge towards a single ‘vanishing point‘. This is a point that is located directly in front of the viewer’s eyes, on a ‘horizon line’ (also known as an ‘eye level line’), as illustrated in the photo below:
All receding edges of the buildings in this one point perspective photo angle towards the single vanishing point. The position of the vanishing point tells us that the photographer was crouching down, with his eye level lowered.

​

It is possible to draw over photographs to identify vanishing points, horizon lines and true shapes. Studying the work of famous artists can also help you gain an understanding of one point perspective, as shown in the example by Vincent van Gogh below.
Key Points:
  • Surfaces that face the viewer are drawn using their true shape
  • Surfaces that travel away from the viewer converge towards a single vanishing point
Picture
Picture
Picture
‘Bedroom in arles’ by Vincent van Gogh – identifying perspective lines

One Point Perspective: Definition

9/5/2018

 
Dictionary.com define one point perspective as:
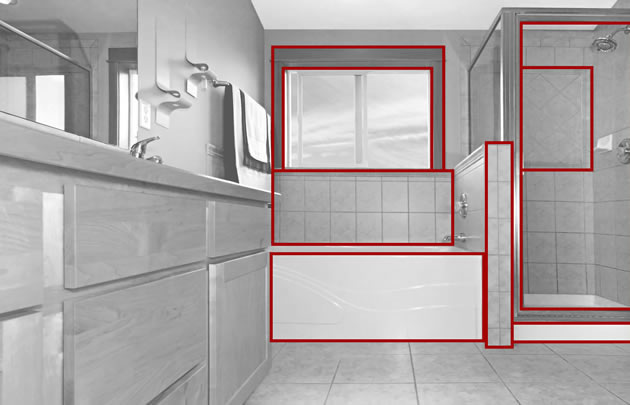
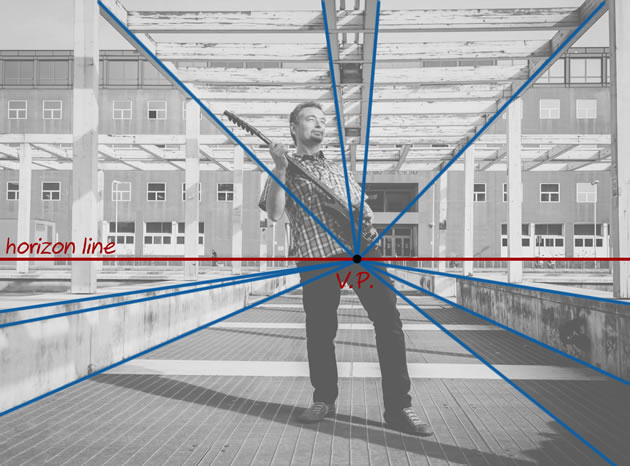
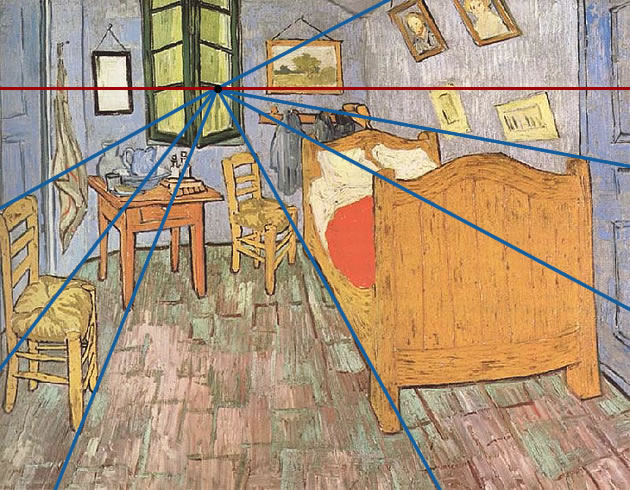
…a mathematical system for representing three-dimensional objects and space on a two-dimensional surface by means of intersecting lines that are drawn vertically and horizontally and that radiate from one point on a horizon line…
Although this definition sounds complicated, the concept is relatively simple. One point perspective is a drawing method that shows how things appear to get smaller as they get further away, converging towards a single ‘vanishing point’ on the horizon line. It is a way of drawing objects upon a flat piece of paper (or other drawing surface) so that they look three-dimensional and realistic.
Drawing in one point perspective is usually appropriate when the subject is viewed ‘front-on’ (such as when looking directly at the face of a cube or the wall of building) or when looking directly down something long, like a road or railway track. It is popular drawing method with architects and illustrators, especially when drawing room interiors. 

Note: If you need to draw something that is not facing you directly, but rather has a corner nearest to you, two point perspective is likely to be more appropriate.

​

Hatching, Cross Hatching, and other Line Techniques

9/5/2018

 
As well as representing contours, line can also be used to apply tone (light and shadow) to a drawing. This can be done by altering the:
  • Gap between the lines
  • Lightness / darkness of the line
  • Thickness of the line
There are many line techniques can be used to create tone, as illustrated in the worksheet below. Common techniques include:
  • Small dashes
  • Hatching (long, parallel lines on an angle)
  • Cross-hatching (parallel lines at right angles)
  • Stippling (dots)
  • Scribbles
  • Small crosses
  • Small circles
Picture

Wire Sculpture Line Drawing

9/5/2018

 
Definition: Wire can be cut and bent into shapes with pliers to create three-dimensional ‘drawings’, often resulting in a work filled with flowing, curved lines. These wire sculptures can be attached to a two-dimensional frame or a flat surface, hung in the air, or be left free-standing, changing in appearance as a viewer moves around the room. Due to their flexible nature, wire sculptures often move slightly in the wind, adding an extra interactive element to the work.
Picture

Planar Analysis Drawing

9/5/2018

 
Definition: A planar analysis drawing simplifies complex curved surfaces into flat planes, using straight lines. This process helps students to think about the underlying structure of objects and results in an analytical drawing, that is rather mechanical in appearance.
Picture

Cross Contour Drawing

9/5/2018

 
Definition: A cross contour drawing contains parallel lines that run across the surface of an object (or radiate from a central point), such as those that appear on a topographical map or a digital wireframe. The lines can run at any appropriate angle (sometimes at multiple angles) and may continue across objects and into the background. Cross contour drawings typically follow the rules of perspective, with lines drawn closer together in the distance and further apart in the foreground. In this type of drawing, the illusion of three-dimensional volume is created entirely with line.
Picture
Picture
Picture

Contour Drawing

9/5/2018

 
Definition: A contour drawing shows the outlines, shapes and edges of a scene, but omits fine detail, surface texture, colour and tone (‘contour’ is French for ‘outline’). According to Wikipedia:
The purpose of contour drawing is to emphasize the mass and volume of the subject rather than the detail; the focus is on the outlined shape of the subject and not the minor details.
Picture

Continuous LIne Drawing

9/5/2018

 
Definition: A continuous line drawing is produced without ever lifting the drawing instrument from the page. This means that, in addition to outlines and internal shapes, the pencil must move back and forth across the surface of the paper, with lines doubling back on each other, so that the drawing is one free-flowing, unbroken line. To avoid the temptation to erase lines, it can be helpful to complete a continuous line drawing with an ink pen, varying the line weight, as needed, to indicate perspective and areas of light and shadow. Like the drawing methods described above, this drawing method develops confidence and drawing speed, and encourages your eyes and hand and brain to work together. Continuous line drawings work best with in-depth observation of your subject, without interference from your thinking mind.
Picture

Gesture Drawing / Times Drawing / Movement Drawing

9/5/2018

 
Definition: A gesture drawing is completed quickly – often in short timed durations, such as 20, 30, 60 or 90 seconds – using fast, expressive lines. Gesture drawings capture basic forms and proportions – the emotion and essence of a subject – without focusing on detail. Due to their rapid completion, they are a great way to record movement and action, as well as increase your drawing speed, confidence and intuitive mark-making skill. Gesture drawings are best completed with smooth, easily applied mediums (chunky graphite pencils, charcoal sticks, pastels, soft brushes dipped in Indian ink, for example), without the use of an eraser. They are often completed on large, inexpensive sheets of paper, where you can move your arm fluidly, be bold with mark-making, and not worry about mistakes. As with blind drawings, gesture drawing is an ideal warm-up activity.
Picture
Picture
A gestural figure drawing by Chelsea Stebar
<<Previous
Forward>>

Visual Art by Dan dressler

Contact Information

Dan R. Dressler
​Waltham, MA 02453
visualart@dandressler.com
  • Home
  • My Work
    • acrylic transfer
    • Summer_2019
    • Beneath the Surface
    • Multi Media Collage
    • Photography
    • Drawings
    • Mono Prints
  • Contact